
How to Manage SFW and NSFW Wallpapers Automatically
March 2026 · Tutorial· 8 min read
In a previous post we introduced the new startup and shutdown groups in Wallpaper Slideshow Pro 6 and briefly showed how they can be used to manage SFW and NSFW wallpaper collections. In this tutorial we'll go through the complete setup — from configuring the WallHaven plugin to download wallpapers from wallhaven.cc, to setting up groups so your desktop wallpaper switches between safe and private collections entirely on its own.
Automatic SFW/NSFW Wallpaper Switching: The Idea
If you keep both safe-for-work and not-safe-for-work wallpapers on your PC, you've probably had that moment of panic when someone walks by at the wrong time. Wallpaper Slideshow Pro 6 solves this with a simple but effective approach: when you launch the program, your desktop automatically shows your private (NSFW) wallpaper collection; when you close it — or the PC shuts down — it switches back to a safe (SFW) set. No hotkeys, no manual switching, no risk of forgetting.
To make things even better, we'll use the WallHaven plugin to automatically download high-quality wallpapers from wallhaven.cc and let the plugin sort them into separate SFW and NSFW folders. The result is an always-fresh, self-managing desktop wallpaper changer.
Accessing the Settings
All the configuration happens in two places: the main window and the Options dialog. To open the main window, right-click the Wallpaper Slideshow Pro icon in the system tray (the notification area near the clock) and choose Settings. From there, click Options... in the bottom-left corner to open the Options dialog, where you'll find Groups, Plug-Ins, and everything else.
Step 1 — Configure the WallHaven Plugin
The WallHaven plugin connects to wallhaven.cc and automatically downloads wallpapers based on search feeds you define. The key feature for our SFW/NSFW setup: downloaded images are automatically sorted into separate sfw, sketchy, and nsfw subfolders based on the content rating assigned by wallhaven.cc. This means you don't need to organize anything manually — the plugin does it for you.
Open the Plugin Configuration
Go to Options → Plug-Ins, find WallHaven in the list and double-click it (or select it and click Configure Selected Plug-In...).
Basic Settings
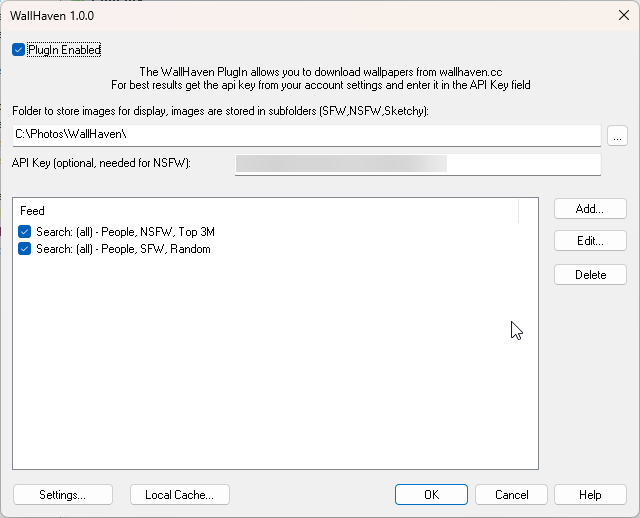
C:\Photos\WallHaven\. The plugin will automatically create sfw and nsfw subfolders inside it.Create Your Download Feeds
Feeds define what wallpapers the plugin downloads from wallhaven.cc. Click Add... to create a new feed. For our SFW/NSFW wallpaper setup you'll want at least two:
SFW Feed
Category: People (or any you prefer), Purity: SFW, Sorting: Random. This provides a steady stream of safe desktop wallpapers.
NSFW Feed
Category: People, Purity: NSFW, Sorting: Top 3 Months. This downloads the most popular NSFW wallpapers from the last three months.
You can add as many feeds as you like — different categories, keywords, sorting methods. The plugin handles them all and always keeps SFW and NSFW images in their respective folders.
After the plugin runs for a while, your download folder will look like this, with wallpapers neatly separated:
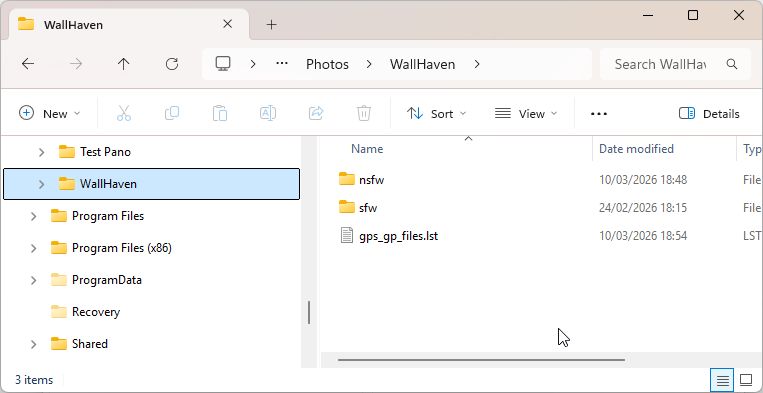
sfw and nsfw subfolders.Step 2 — Create the SFW and NSFW Wallpaper Groups
Groups are the core feature that makes automatic wallpaper switching possible in Wallpaper Slideshow Pro. Each group is a named collection that you can assign folders to, and the program only displays images from the currently active group. Open Options → Groups to get started.
sfw.nsfw.Set the Startup and Shutdown Wallpaper Groups
This is where the automatic switching magic happens. Still in the Groups settings page:
nsfw and the Close radio button next to sfw.Also make sure both Change Wallpaper when switching group and Change Wallpaper when switching group on startup and close are checked. This ensures the desktop wallpaper actually changes immediately when the group switches, rather than waiting for the next scheduled rotation.
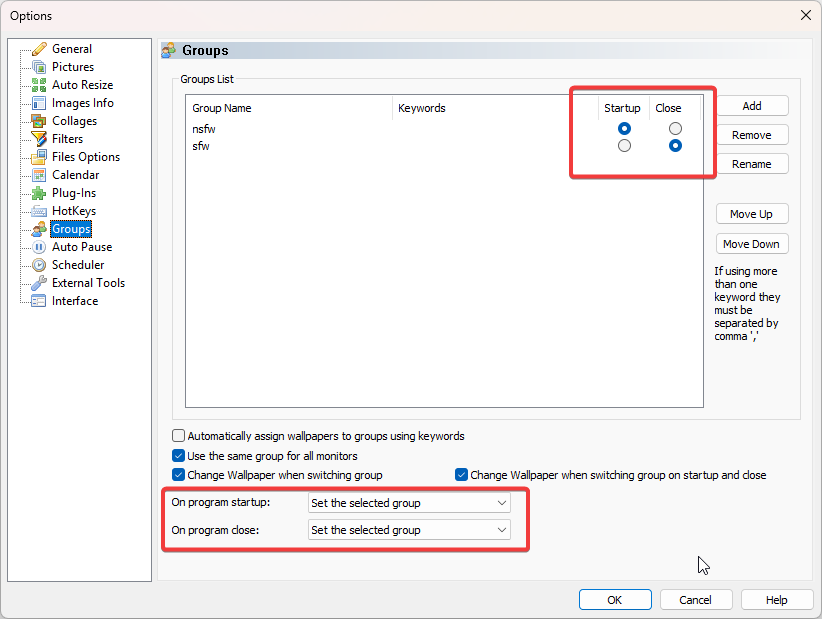
nsfw is the startup group, sfw is the shutdown group. The wallpaper switches automatically on both events.Step 3 — Assign Wallpaper Folders to Groups
Go back to the main window. Add both WallHaven subfolders to the image list if they're not there already (click Add → Folder... and browse to C:\Photos\WallHaven\nsfw\ and C:\Photos\WallHaven\sfw\).
Now assign each folder to its matching group using the Group column in the list:
nsfw folder and set its group to nsfw.sfw folder and set its group to sfw.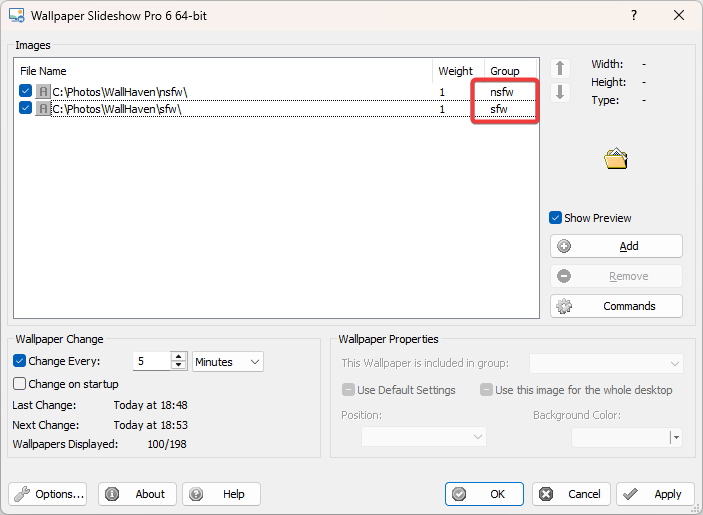
Click OK and you're all set.
How the Automatic Wallpaper Switch Works
From this point on, the wallpaper management is fully automatic:
You launch Wallpaper Slideshow Pro → the nsfw group activates → your desktop shows wallpapers from your private collection.
You close the program (or shut down the PC) → the sfw group activates → the desktop switches to a safe wallpaper before the program exits.
If someone else uses the computer, or if it restarts unexpectedly, the desktop wallpaper on screen will always be from your SFW set. Your private NSFW collection only appears when you intentionally open the program.
Meanwhile, the WallHaven plugin keeps working in the background — downloading fresh wallpapers from wallhaven.cc, sorting them into the correct folders, and cycling out images as they get displayed. You get an ever-changing desktop wallpaper collection that manages itself completely.
Tip: You're not limited to SFW and NSFW. You can create as many wallpaper groups as you need — a Work group for office hours, a Personal group for evenings, seasonal wallpaper collections, or anything else. The same startup and shutdown group logic applies to any combination.
Multi-Monitor Tip: If you have multiple monitors, uncheck Use the same group for all monitors in the Groups settings. This lets you assign different startup and shutdown wallpaper groups to each display independently — for example, keep SFW wallpapers on your external monitor while showing your NSFW collection only on your main screen.
Download Wallpaper Slideshow Pro 6
Wallpaper Slideshow Pro 6 is available as a free 30-day trial with all features unlocked. The WallHaven plugin is not included and can be downloaded from the Download page.
