
How to Use and Save Presets in gPhotoShow Pro
October 2026 · Tutorial · 8 min read
Introduced in gPhotoShow Pro 11.1.0, presets make it easier to reuse settings across slideshows. In this tutorial, you will load a supplied PhotoWall preset, adjust its appearance and save your own version to use again.
What is a gPhotoShow preset?
A preset is a small .gssp file containing selected groups of settings, such as transitions, collage layouts or image information. The program calls it a partial preset because it stores only part of a slideshow configuration.
For example, you can save a PhotoWall layout once and apply it to a family slideshow, a travel collection or your screen saver. Each keeps its own photo folders while using the settings stored in the preset.
| File type | What it stores | When to use it |
|---|---|---|
.gss configuration |
A complete slideshow configuration, including source folders and references to your media. | Save and reopen a particular slideshow. |
.gssp preset |
Selected groups of reusable settings, without source folders or image display times. | Apply the same settings to different slideshows. |
Neither file contains your actual photos, videos or music. Loading a preset changes only the settings it contains; other settings keep their current values. If a saved setting turns an option off, loading the preset turns that option off too.
What you need
- gPhotoShow Pro 11.1.0 or later, with the preset commands available.
- A slideshow or screen saver configuration with your photo folders already selected.
The steps below use Slide Show Maker. You can also use presets in the screen saver configuration window: its Settings menu contains both Load Preset... and Save Partial Preset....
1. Load a preset from the library
- Open your slideshow in Slide Show Maker. If you want to keep its original appearance, use Save → Save To File As... to save a separate copy first.
- Choose Load → Load Preset....
- Select Static PhotoWall Grid Large-11. Read the description below the list to see what it changes.
- Click Load, or double-click the preset name.
- Use Save → Save To File & Preview to save the configuration and see the result with your photos.
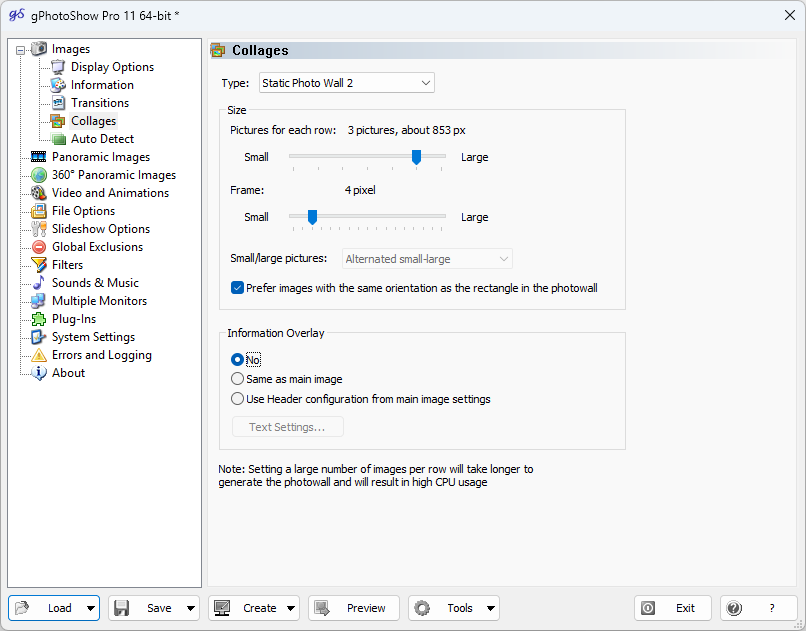
This preset creates a Static PhotoWall with three photos per row, frames and fade transitions. Your source folders and image display times stay as they were. The supplied collage presets also include the transition settings needed to select the appropriate display mode.
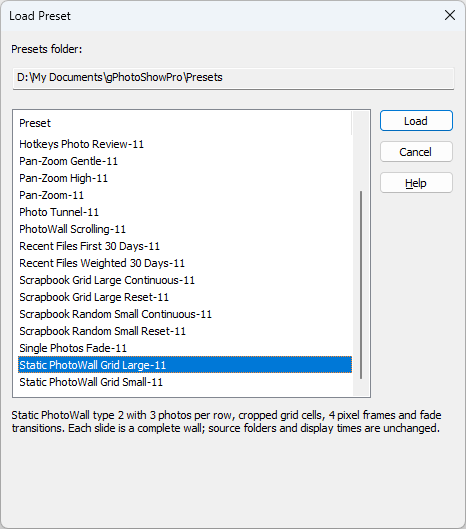
The library is stored in Documents\gPhotoShowPro\Presets. The dialog shows the full path for your Windows account, including a redirected Documents folder. The installer supplies a collection of presets to get you started.
Other included presets to try
| Preset name | What it does |
|---|---|
| Pan-Zoom Gentle-11 | Displays individual photos with gentle Pan & Zoom movement and disables collages. |
| Single Photos Fade-11 | Returns to individual photos with fade transitions, disabling collages and the other presentation modes. |
| Scrapbook Random Small Continuous-11 | Builds a scrapbook of small, randomly positioned photos and replaces them individually when it fills up. |
| Current Time and image Title-11 | Configures image information to display the current time, date and image title. |
| Filters Favorites 4 Stars-11 | Shows ordinary photos rated four or five stars. Requires ratings that gPhotoShow can read from image metadata and replaces the existing filter rules. |
Read each description before loading it, especially for filters and keyboard shortcuts: presets can change how a slideshow behaves as well as how it looks.
2. Create and save your own preset
Use the PhotoWall preset as a starting point, then adjust it to suit your display.
- Open Images → Collages. Adjust the number of pictures per row or the frame size.
- Open Images → Transitions if you want to adjust the transitions used with this layout.
- Choose Save → Save Partial Preset.... In the screen saver configuration window, choose Settings → Save Partial Preset....
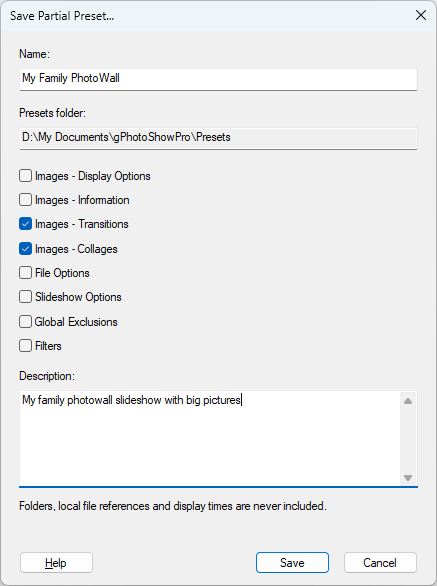
- Enter a name such as My Family PhotoWall. Use a name without a folder path; the
.gsspextension is added automatically. - Select Images - Transitions and Images - Collages. Leave the other groups unchecked for this example.
- Add a description, such as My PhotoWall layout with custom frames and fade transitions.
- Click Save. The preset is saved directly in the library. If that name already exists, the program asks whether to replace the file.
Which settings can you include?
The Save Partial Preset dialog offers eight groups:
- Images - Display Options
- Images - Information
- Images - Transitions
- Images - Collages
- File Options
- Slideshow Options
- Global Exclusions
- Filters
Select only the groups you want to reuse. A preset for information overlays, for example, can contain just Images - Information, so it can be applied to slideshows with different transitions and layouts.
Presets include the portable settings in those groups. Source folders and file lists, folder weights and monitor assignments, image display times, and references to local files or folders are excluded. Other settings pages, such as Sounds and Music, monitor layout and Plug-Ins, are not available as preset groups.
Save the slideshow as well: saving a preset captures your current settings, including unsaved edits, but does not also save the complete slideshow. Use the normal Save commands to keep the updated GSS configuration, or click OK in the screen saver configuration window.
3. Apply your preset to another slideshow
- Open a different slideshow, or create one and add its photo folders.
- Choose Load → Load Preset....
- Select My Family PhotoWall and click Load.
- Preview the result and save the complete configuration with the normal Save commands.
The second slideshow now uses your PhotoWall and transition settings with its own photo collection. Loading a preset keeps the current GSS filename, so saving the slideshow updates that configuration. Use Save To File As... when you want to keep a separate version.
4. Combine presets for different settings
You can load more than one preset in sequence. For example, first load Pan-Zoom Gentle-11 for a slideshow of individual photos, then Current Time and image Title-11 for the information overlay. These presets cover different groups, so their settings can be used together.
If two presets contain the same setting, the one loaded last takes precedence. Loading Pan-Zoom Gentle-11 after your PhotoWall preset, for example, switches to individual photos because it also saves Collages with the collage layout disabled.
After combining presets, make any final adjustments and save the resulting slideshow configuration.
5. Share presets or open them from another folder
To share a preset, open Documents\gPhotoShowPro\Presets in File Explorer and copy the relevant .gssp file. The recipient can add it to the same library folder on their computer, then open Load Preset....
To use a preset without adding it to the library:
- In Slide Show Maker, choose Load → Load From File... and select the
.gsspfile. - In the screen saver configuration window, choose Settings → Import Settings....
These commands accept both GSS configurations and GSSP presets. Opening a GSSP applies its included settings to the current configuration; it does not copy the file into the library.
The recipient needs a version of gPhotoShow that supports the settings in the preset. If a preset is incompatible, it is rejected without changing the current settings.
Troubleshooting presets
- The preset commands are missing
- Check that you have installed the update introducing presets. Use the Load and Save menus in Slide Show Maker, or the Settings menu in the screen saver configuration window.
- My preset does not appear in the list
- Check the full library path shown in Load Preset. Put the
.gsspfile directly in that folder, then reopen the dialog. A preset opened from another folder is not automatically added to the library. - The Save button is disabled
- Enter a name and select at least one group of settings.
- Some settings did not change
- Check which groups you included when saving the preset. Source folders, image display times and local file references are always excluded. To return to individual photos, try Single Photos Fade-11, which also disables collages.
- The Load button is disabled or the preset is rejected
- Read the explanation in the dialog. The file may be unreadable or require a newer version. Invalid or incompatible presets are not partially applied.
Build a library of settings you use often
Start with a favourite layout, then add separate presets for captions, transitions or filters. Descriptive names and short descriptions make it easier to choose the right settings when creating your next slideshow.
To rotate automatically between complete slideshow configurations, save each result as a .gss file and follow our tutorial on automatically changing gPhotoShow configurations with ControlSS.
