
How to Automatically Change gPhotoShow Configurations with ControlSS
October 2026 · Tutorial· 10 min read
The idea is simple: save each presentation style in its own .gss configuration file, then let ControlSS choose which one gPhotoShow uses. You can rotate through the files in order, choose them randomly, or change the selection at regular intervals.
This tutorial sets up a repeatable sequence: Static PhotoWall → Pan & Zoom → Photo Tunnel. Each screen saver session uses one configuration; ControlSS prepares the next one between sessions.
What you need
- gPhotoShow Pro installed, with access to the photos you want to display.
- A recent version of Control Screen Saver (ControlSS), running in the Windows notification area near the clock.
- A writable folder for your saved slideshow configurations. In this example, use a folder named
gPhotoShow Rotationinside your Documents folder.
A .gss file stores slideshow settings and references to your media. You can use the same image folders in all three configurations without making three copies of your photos.
1. Prepare the configuration folder in ControlSS
- Right-click the ControlSS tray icon and choose gPhotoShow Settings → Configure....
- Set GSS folder to your
gPhotoShow Rotationfolder. - While creating and testing the files, leave Change on ControlSS startup, Change on every screen saver start and Change periodically unchecked.
Keep all three files directly in this folder: ControlSS does not include files stored in subfolders. Use the following names so their alphabetical order matches the sequence you want.
| Configuration file | Presentation style | What you see |
|---|---|---|
01-Static-PhotoWall.gss |
Static PhotoWall | Several photos arranged together in a mosaic. |
02-Pan-and-Zoom.gss |
Pan & Zoom | Individual photos with gentle movement and zoom. |
03-Photo-Tunnel.gss |
Photo Tunnel | A moving stream of photos travelling from the centre towards the edges. |
2. Create the three gPhotoShow configurations
Static PhotoWall: a mosaic of your photos
- In the ControlSS configuration list, click New... and create
01-Static-PhotoWall.gss. The new file opens in the gPhotoShow editor. - On the Images page, add the photo folders you want to use.
- Open Images → Transitions and select 2D/3D - HW Accelerated. This gives the first configuration regular transitions without Pan & Zoom movement.
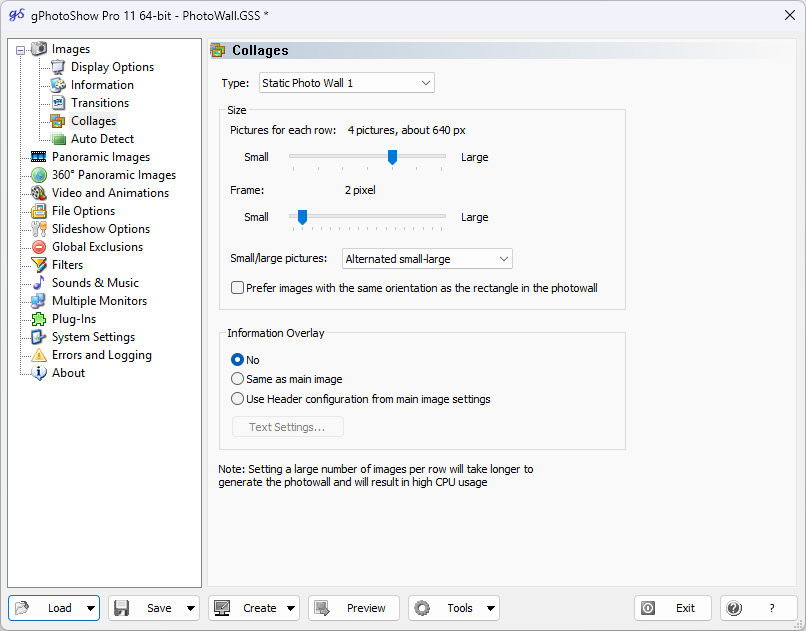
- Open Images → Collages. In Type, select Static Photo Wall 1. Adjust the picture size and frame to suit your display.
- Save the settings to
01-Static-PhotoWall.gssusing Save, then close the editor.
Static PhotoWall is a layout on the Collages page. For this example, choose that layout rather than the separate Scrolling Photo Wall presentation mode.
Pan & Zoom: movement through individual photos
- Back in ControlSS, select
01-Static-PhotoWall.gss, click Duplicate... and name the copy02-Pan-and-Zoom.gss. The copy opens for editing. - On Images → Collages, change Type to None. This makes the second configuration display individual photos instead of a mosaic.
- On Images → Transitions, select Pan & Zoom.
- Use the Settings... button beside Pan & Zoom to adjust movement duration and zoom levels if desired.
- Save
02-Pan-and-Zoom.gssand close the editor.
Duplicating the first file preserves the image folders and other shared preferences. You only need to change the presentation settings.
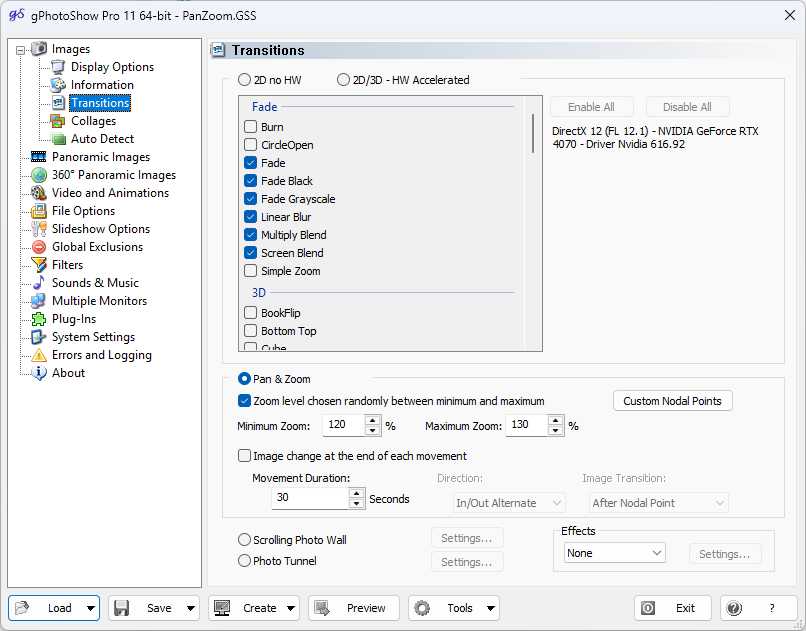
Photo Tunnel: a stream of moving images
- In ControlSS, select
02-Pan-and-Zoom.gssand duplicate it as03-Photo-Tunnel.gss. - In the gPhotoShow editor, open Images → Transitions and select Photo Tunnel.
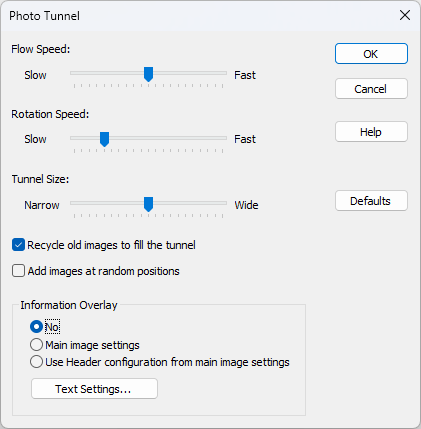
- Click its Settings... button to adjust flow speed, rotation speed and tunnel size. Keep the collage type set to None.
- Save
03-Photo-Tunnel.gssand close the editor.
With the automatic-change options still off, select each file in ControlSS and click Test to check its appearance. Test runs the selected file without applying it as the active screen saver configuration. If the settings window ends up behind another program, select it in the taskbar or choose gPhotoShow Settings → Configure... again.
3. Enable automatic rotation between screen saver sessions
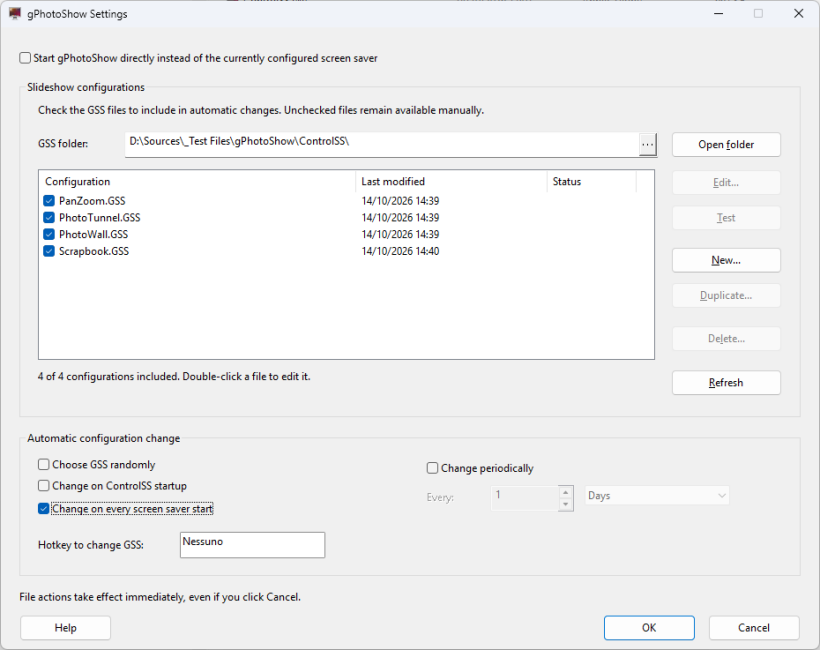
For the ordered sequence in this tutorial, use these settings in the ControlSS gPhotoShow Settings window:
- Check all three files in the configuration list.
- Leave Choose GSS randomly unchecked.
- Check Change on every screen saver start.
- Leave Change on ControlSS startup and Change periodically unchecked, so they do not advance the sequence separately.
- Click OK to save the folder, checked files and rotation options.
When does the change happen? Although the option is labelled “Change on every screen saver start”, ControlSS prepares the next configuration after the current screen saver session ends. The next launch uses that selection. It does not switch presentation modes halfway through a running slideshow.
4. Test Static PhotoWall → Pan & Zoom → Photo Tunnel
- Choose Display Properties... from the ControlSS tray menu and select gPhotoShow as the Windows screen saver. Set the idle delay you prefer.
- In the gPhotoShow Settings tray submenu, select
01-Static-PhotoWall.gssto make it the starting configuration. - Choose Start Screen Saver from the tray menu. Let Static PhotoWall run for a few seconds, then exit the screen saver normally.
- Wait a few seconds for ControlSS to prepare the next configuration, then start the screen saver again. This time, you should see Pan & Zoom.
- Repeat once more to see Photo Tunnel. After that session, the sequence returns to Static PhotoWall.
Keep ControlSS running for automatic changes to work. Enable Startup Automatically in its tray menu if you want it to start when you sign in to Windows.
If you only want to launch gPhotoShow manually through ControlSS, the Start gPhotoShow directly instead of the currently configured screen saver option is also available. Selecting gPhotoShow in Windows is still the way to make it the normal Windows idle screen saver.
Other ways to change gPhotoShow configurations automatically
Choose a different style randomly
Enable Choose GSS randomly to replace the fixed sequence with random selection from the checked files. With more than one configuration included, ControlSS avoids choosing the currently active file again immediately.
Change the selected configuration every hour
For a time-based setup, uncheck Change on every screen saver start, check Change periodically and set Every to 1 Hours. Keep random selection off to follow the same file order, or turn it on for variety.
The interval updates the configuration selected for a subsequent launch. It does not start the screen saver, interrupt an existing slideshow or give each mode exactly one hour of screen time. You can also choose Minutes or Days; the first change may occur soon after enabling the option if a change is already due.
Select a new configuration when ControlSS starts
Enable Change on ControlSS startup to advance the selection when ControlSS launches. Combined with Startup Automatically, this gives you a new selection when you sign in. It is separate from the option that rotates configurations between screen saver sessions.
Useful controls for everyday use
- Change GSS Now: advance to the next checked configuration immediately, using your sequential or random setting.
- Hotkey to change GSS: assign a shortcut in the settings window. ControlSS shows a tray notification when it is used and warns if the shortcut cannot be registered.
- Temporarily skip a style: uncheck its file and click OK. The file stays available for editing, testing and explicit selection from the tray menu.
- Edit a configuration: select its file and click Edit, or double-click it. Save the changes in gPhotoShow before testing again.
Troubleshooting automatic configuration changes
- The gPhotoShow Settings submenu is missing
- ControlSS shows it only when gPhotoShow is installed and detected. Check the installation and restart ControlSS if you installed gPhotoShow while it was running.
- The file list is empty
- Check the GSS folder and click Refresh. Put the
.gssfiles directly in that folder, not in subfolders. - The same presentation style keeps appearing
- Check that all three files are included, the rotation option is saved and ControlSS is running. Test the files individually to confirm that each contains a different presentation style. If every file is unchecked, automatic rotation stops.
- Pan & Zoom still shows a mosaic
- Edit
02-Pan-and-Zoom.gssand set Collages → Type to None, then save it. Pan & Zoom can also animate a static collage, so changing the transition mode alone does not remove that layout.
Build your own rotation
Once these three configurations are working, you can add more variations: a family PhotoWall, a travel Pan & Zoom slideshow or a Photo Tunnel using a different collection. Save each variation as a separate GSS file and check the ones you want ControlSS to include.
