gPhotoShow Pro + Home Assistant: Turning a Digital Photo Frame into a Smart Home Dashboard
March 2026 · DIY & Home Automation· 8 min read
A while back I wrote about how I built a digital photo frame using gPhotoShow Pro and a mini PC. If you haven't read that yet, start there — this article picks up right where it left off. Since then I've upgraded almost everything: the PC, the monitor, and most importantly what the frame actually shows. It's gone from a nice-looking photo slideshow to a living dashboard that tells me in real time how much power my house is consuming, what the solar panels are producing, and whether it's warmer inside or outside. Here's how I got there.
The Old Setup Was Getting Tired
My original photo frame was built around a MinisForum N40 mini PC — a tiny, fanless machine that I picked up for next to nothing. At around 4 watts of idle power consumption it was impressively efficient, but with only 4GB of RAM and Windows 11 onboard it had started to show its age. Scrolling through large photo collections was fine, but the moment I tried anything more demanding — 360-degree panoramas, video files, or the heavier transition effects — things got noticeably sluggish. The frame was working, but it wasn't quite living up to what gPhotoShow Pro is actually capable of.
The monitor wasn't helping either. The original screen was decent but not exceptional, and I'd been eyeing the idea of a 4K upgrade for a while.
So I decided to do something about both problems at once.

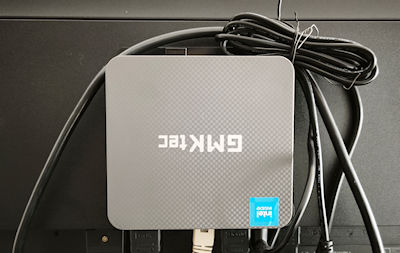
Upgrading to the GMKtec G3 Plus
After a bit of research I landed on the GMKtec G3 Plus. It runs an Intel N150 processor with 16GB of RAM, and while it's not a powerhouse by any stretch it's exactly the right amount of muscle for a digital photo frame that needs to run 24 hours a day without breaking a sweat. The downside compared to the MinisForum is power consumption — it sits at around 9 watts at idle versus the 4 watts of the old machine. For a device that never sleeps that adds up over the course of a year, so it's worth knowing upfront. For me the trade-off was worth it.
The difference in practice is immediately obvious. Transitions that used to stutter are now silky smooth. The 360-degree spherical panorama viewer, which felt almost unusable before, now pans and zooms with no hesitation whatsoever. And 4K video files — which I hadn't even bothered trying on the old machine — play back perfectly.
Speaking of 4K, I also replaced the monitor with a 25-inch 4K display. gPhotoShow Pro handles it without any configuration beyond pointing it at the right resolution — the image quality on high-resolution photos is genuinely impressive on a proper 4K panel.
Quick Spec Comparison
| MinisForum N40 | GMKtec G3 Plus | |
|---|---|---|
| CPU | Intel N4020 | Intel N150 |
| RAM | 4 GB | 16 GB |
| Idle power consumption | ~4W | ~9W |
| 4K video playback | Struggled | Smooth |
| 360° panoramas | Sluggish | Fluid |
| Heavy transitions | Occasional stutter | Smooth |
| OS used | Linux (Debian + Docker) | Windows 11 |
| Current role | Home Assistant hub | Digital photo frame |
| Best for | Budget build / Home automation | Daily use / 4K content |
The Old MinisForum Found a New Purpose
Here's the part I'm most happy about: I didn't throw the MinisForum away. I wiped Windows off it, installed Debian Linux, and set up Docker. From there I deployed Home Assistant, Zigbee2MQTT, and Mosquitto — the MQTT broker that acts as the messaging backbone for the whole setup. What was a slightly underpowered Windows machine turned out to be a perfectly capable Linux home automation hub. It runs everything without complaint and the low power consumption is now an advantage rather than an afterthought.
If you're on the fence about whether a low-spec mini PC can handle Home Assistant — it absolutely can, especially when you ditch Windows and run it lean on Linux with Docker.
What's Connected to Home Assistant
Before getting to the gPhotoShow integration it's worth describing what's actually running in the house, because that determines what data is available to display.
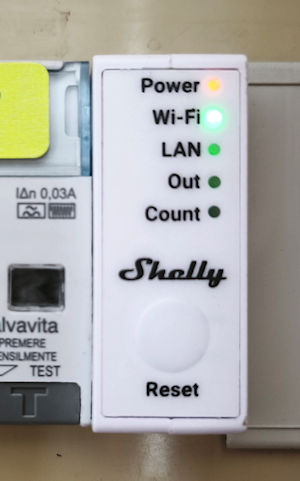
For energy monitoring I installed a Shelly Pro EM 50, which sits in the electrical panel and measures real-time consumption and solar production. It reports both values to Home Assistant every few seconds, which means I can see live power data rather than averages.
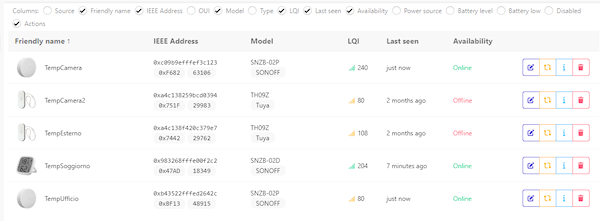
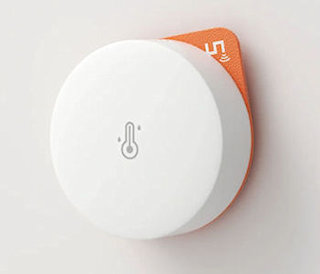
For temperature and humidity I deployed several Sonoff SNZB-02P sensors around the house via Zigbee. These are small, battery-powered, and connect through Zigbee2MQTT — no proprietary hub needed. I have one in each main room and the readings are accurate enough to be useful.
On top of that I've integrated the Vaillant boiler thermostat directly into Home Assistant, which gives me heating status and setpoint control, and I'm pulling outdoor temperature and humidity from a nearby personal weather station rather than relying on generic weather APIs. The local station gives much more accurate readings for my actual location.
Setting Up the MQTT Plugin in gPhotoShow Pro
gPhotoShow Pro has a built-in MQTT plugin that connects directly to any MQTT broker — in my case the Mosquitto instance running on the MinisForum. Once the plugin is configured with the broker address, port, and credentials, you can subscribe to any MQTT topic and display its value as an overlay on your photos and videos. No coding required, no middleware — it reads from the broker and puts the text on screen.
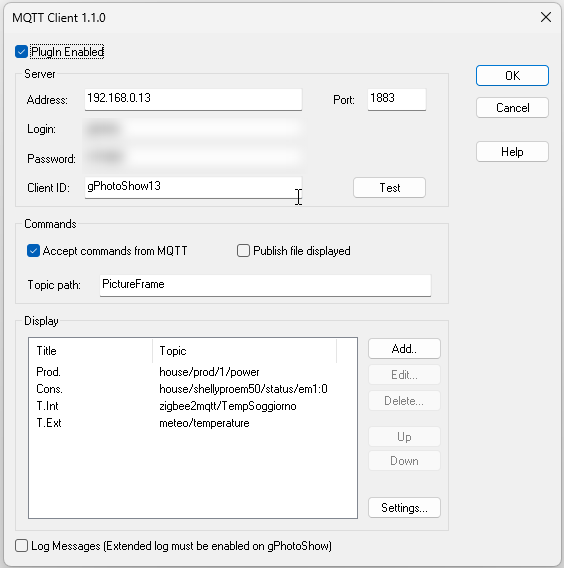
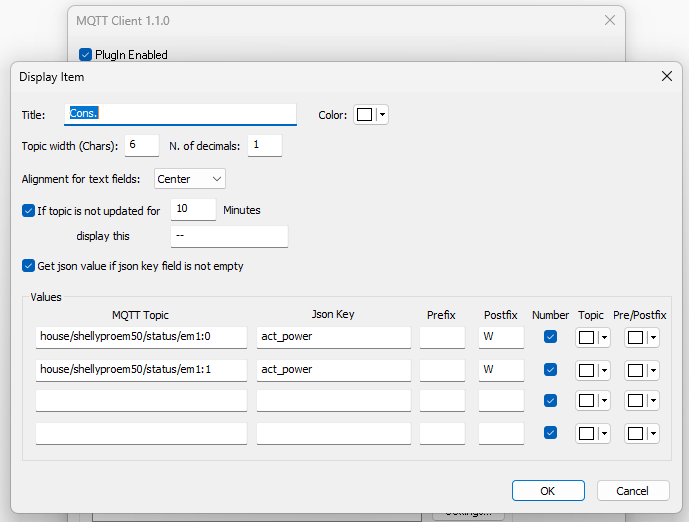
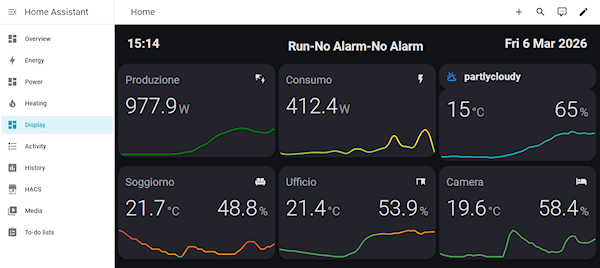
What I'm Displaying
I set up four data points as overlays, each pulling from a different MQTT topic that Home Assistant publishes:
Instantaneous home power consumption — pulled from the Shelly Pro EM 50 via Home Assistant. Displayed in watts, updates every few seconds. Useful for spotting that someone left the oven on.
Solar PV production — also from the Shelly, the import/export reading tells me at a glance whether the panels are covering consumption or feeding back to the grid.
Outdoor temperature and humidity — from the nearby weather station integration. Much more accurate than a generic weather widget.
Indoor temperature and humidity — averaged from the SNZB-02P sensors, or displayed per-room depending on which sensor topic I subscribe to.
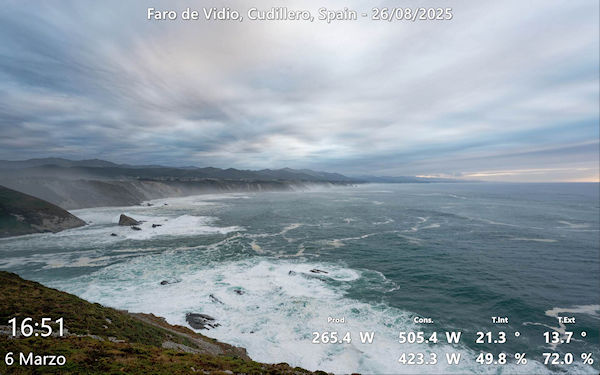
The overlay sits in a corner of the frame at a readable size, doesn't interfere with the photos, and updates live. It's subtle enough that the frame still looks like a photo frame rather than a monitoring dashboard, but the information is always there when you glance at it.
How Home Assistant Publishes the Data
Home Assistant can publish any sensor value to an MQTT topic either natively or through automations. For sensors that are already integrated (like the Shelly and the Zigbee devices) you can use the MQTT integration or a simple automation that triggers on state change and publishes to a topic of your choice. For the weather station data I wrote a short automation that re-publishes the relevant values to clean, predictable topic names that gPhotoShow can subscribe to reliably.

The End Result
The frame now does two things at once: it shows our photo collection — including 4K shots, 360-degree panoramas from trips, and video clips — while quietly displaying live data from around the house. Guests almost always notice the power consumption overlay first and ask how it works, which is a good sign that it's visible enough to be useful without being distracting.
Total cost of the upgrade was around €180 for the GMKtec G3 Plus and around €150 for the 4K monitor. The MinisForum was already owned and the Home Assistant setup cost nothing beyond the hardware that was already running.
If you already have a digital photo frame running gPhotoShow Pro and any kind of MQTT-capable smart home setup, adding the data overlay takes maybe half an hour and requires no programming knowledge. It's one of those upgrades that seems minor until you've lived with it for a week and can't imagine not having it.
Want to Try gPhotoShow Pro?
If you're starting from scratch, download the free 30-day trial — no registration needed. The MQTT plugin can be downloaded from the gPhotoShow download page and works with any standard broker including Mosquitto.
Already Have gPhotoShow Pro?
The MQTT plugin documentation is available in the plugins section of the site. If you're upgrading from an older version, check the upgrade page.