gPhotoShow can be used to create slideshows that can be easily started on your the local computer, this kind of slideshows are basically gPhotoShow configuration files saved on your disk. When you wish to start a slideshow just run gPhotoShow passing as a parameter one of the saved files. In this quick start tutorial you will see how to create these configuration files and how to run them.
gPhotoShow installer optionally creates a shortcut on the desktop to easily start gPhotoShow:
![]()
If you have that icon simply double click on "gPhotoShow SlideShow Maker" in other case open the windows start menu as shown here:
Windows 11

Select "gPhotoShow Slideshow Maker" and gPhotoShow will start:

This is the gPhotoShow main window, the tree on the left allows you to choose various sections where you can configure specific options:
- Images: basic settings for pictures
- Display Options: settings to control pictures resize and display
- Information: settings to control which info to display over images. For example here you can configure gPhotoShow to display file name or Exif / IPTC / XMP metadata fields over pictures.
- Transitions: transition effects. Here it is possible to choose transition effects or set Pan&Zoom
- Scrapbook: Scrapbook mode. When is enabled gPhotoShow first displays a background image then overlays several smaller pictures until it finds available space or a file of another type is found (for example a video)
- Panoramic Images: basic settings for panoramic images. Panoramic images are images where the horizontal side is much wider than normal pictures so they don't look well when resize to fit the screen so gPhotoShow offers you another way to see them, they are scrolled across the screen.
- Video and Animations: basic settings for video files
- Web and 360 Panoramas: basic settings for web pages and spherical panoramas
- Files options: in this sections there are settings to filter file names and to control the display order
- Slideshow options: options for the slideshows, for example you can configure mouse actions and hot keys used during the slideshow
- Global Exclusions : options to exclude files from slideshow with filters on file names or file dates
- Filters: settings to choose which files to display on each monitor. For example it is possible to display only horizontally oriented images or pictures with a rating greater than 1
- Sound and Music: basic settings for audio files played during the slideshow. For example here you can configure a background music.
- Multiple monitors: specific settings for multiple monitors systems
- Plug-Ins: in this section you can configure installed PlugIns
- System Settings: in this section you can set some system wide options. For example you can set gPhotoShow as logon screen saver (screen saver the runs when no user is logged in)
All pages are exactly the same as the screen saver so you can take a look at the screen saver tutorial.
When started as "Slideshow Maker" gPhotoShow main window has some additional buttons:
- Load : Clicking on this button will open a menu with load commands:
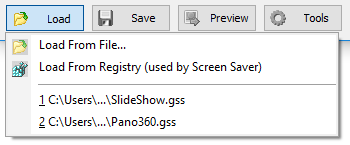
You can load a previously saved file or you can load the settings from the gPhotoShow screen saver.
- Save: Clicking on this button will open a menu with save command:
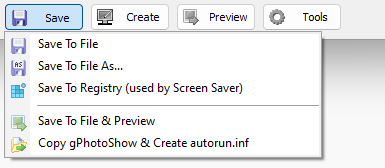
You can save current settings to a disk file, save to the system registry (settings to be used by the gPhotoShow screen saver)
To create a slideshow to be run on the local computer simply configure gPhotoShow in the way you prefer, for example you can enter one or more folders where you stored your pictures and video. Then click on the "Preview" button, settings will be saved and slideshow will start.
gPhotoShow settings are saved to a file with extension .gss, you can start again a slideshow by simply double-clicking on a .gss file. Or you can create shortcuts to your slideshows and put them on the desktop so you can easily start them.
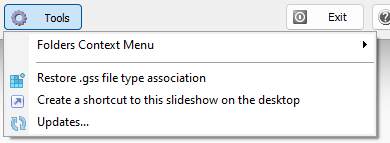
Click on the "Tools" button and choose "Create a shortcut to this slideshow".
Desktop Slideshow
The menu on Create button contains an item to run the slideshow as "Desktop Slideshow" and when creating a shortcut gPhotoShow will prompt you if you wish a normal slideshow or a desktop slideshow.
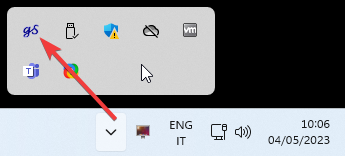
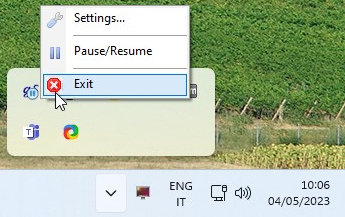
Desktop slideshow is a slideshow that runs on the desktop, under all running programs. When running gPhotoShow will add an icon to the windows notification area, right cliick on it for operations on the slideshow
Windows Integration
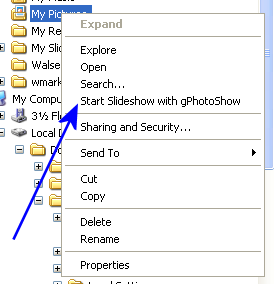
When installed gPhotoShow adds an item to the windows context menu, in this way you can quickly and easily start slideshows on folder containing pictures. This item can be added/removed by clicking on the "Tools" button in the gPhotoShow main window and choosing "Folders Context Menu":
When windows integration is enabled you can right click on a folder and start a gPhotoShow slideshow by simply clicking on the item "Start Slideshow with gPhotoShow":
This slideshow can be customized by editing the gPhotoShow.gss in the gPhotoShow installation folder, usually c:\Program Files\gPhotoShow